Calibration & Recalibration: The Keys to Optimal Imaging System Performance
Electricity-powered, man-made light is all around us—from lamps and fixtures in our homes and workplaces, to the display screens of our smartphones and televisions, to invisible infrared wavelengths used for 3D sensing applications. It’s important for manufacturers to ensure the performance, functionality, accuracy, and safety of light sources and displays. In many industries, regulatory standards require rigorous product testing and reporting.
The science of light measurement, called photometry, is a key component of product development and quality assurance regimens. To test lighting and illuminated devices, manufacturers use metrology instruments designed specifically to measure brightness (luminance) and color (chromaticity).
As important as it is to measure and document product performance, its equally important that the instruments used to take these measurements are accurate. Metrology instruments such as spectrometers, light meters, photometers, and colorimeters must be calibrated so that users can rely on the measurement results they produce.
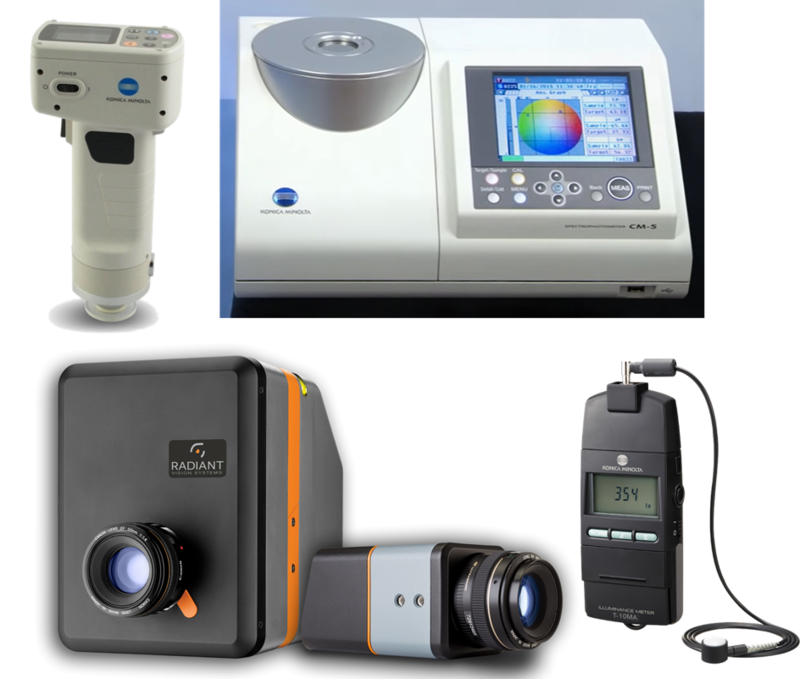
Examples of light and color metrology instruments (clockwise from upper left): Konica Minolta's CR-400 Chroma Meter, CM-5 Benchtop Spectrophotometer, and T-10A Illuminance Meter, and (lower left) Radiant's ProMetric® Imaging Photometer and Imaging Colorimeter.
Calibrating Metrology Equipment
There are three primary objectives for calibrating an instrument. First, to check the accuracy of measurements taken by the instrument. Calibration quantifies errors or uncertainties within measurement processes and ensures performance to an acceptable level, or tolerance. It compares the performance of the instrument with a known standard to identify any discrepancies.
If a discrepancy is found, the instrument can be adjusted to match the standard, or simply noted for user reference if it’s within tolerances. For example, calibration of photometric imaging systems ensures the accuracy of luminance measurements taken with the device by ensuring measurements fall within an error tolerance of + or - percentage deviation from a known value. For colorimetric imaging systems, calibration ensures accurate luminance and chromaticity measurements (which are assessed based on deviations from known coordinates on a CIE chromaticity diagram).
The second objective of calibration is to ensure traceability of the equipment’s performance and measurements to universally accepted standards. In industries such as automotive where requirements and regulations mandate that lighting and displays meet precise performance criteria industry-wide, being able to trace an instrument’s measurement accuracy back to a universal standard is essential. For example, many SAE standards for automobiles specify NIST-traceable equipment be used to measure head-up displays, console displays, or instrument panels in the vehicle.
The National Institute of Standards and Technology (NIST) defines standard reference data, testing methods, and tools to ensure measurement quality and evaluate measurement uncertainty from universally accepted reference values (typically measured using the International System of Units, or SI units). NIST-traceable calibration certifies that a lab or manufacturer is equipped and capable of calibrating equipment to meet specific standards, and that products by a manufacturer match NIST-maintained measurement standards. “With NIST traceable calibration, any measurements taken with a certified instrument have an unbroken chain of measurement leading back to NIST-maintained standards with known and documented uncertainties for each step in the chain and a quality assurance program in place to address them.”1
Finally, the third calibration objective is repair or recalibration after the instrument has been in use for a period of time, during which it may have fallen outside of accuracy or performance tolerances. Recalibration restores the instrument to its original specifications and accuracy.
Light & Color Reference: CIE
For light measurement devices, luminance is commonly measured—a unit quantified by a single numeric value that defines the perceived brightness of any visible light source. For devices that measure chromaticity (color), however, quantifying perceived values is more complicated.
To address this challenge, in 1931 the Commission Internationale de L’éclairage (CIE) established a standard for the scientific quantification of the physical properties of color, as they are perceived by a human observer. The CIE values enable precise mathematical representation and reproduction of colors, often represented graphically in a triangular diagram.
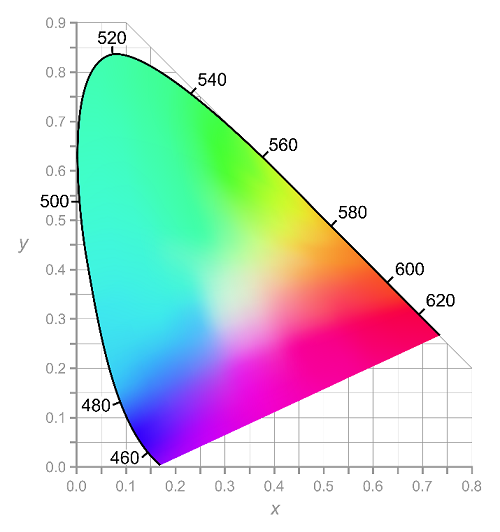
A 2D graphical representation of the CIE 1931 color space, including all colors visible to the human eye. The black numbers on the edge give the visible spectrum in wavelengths, while perceived colors are represented as coordinate points (x and y) within these limits.
To provide the most accurate measurement of chromaticity as seen by the human eye, a device must measure chromaticity in relation to this diagram. Today, there are several methods used by imaging system manufacturers to measure the color of light output. For example, one method uses a color filter array (a mosaic of tiny red, green, and blue tiles) called a Bayer Pattern (or RGB) filter. Another method uses three individual color filters, called Tristimulus (XYZ) filters, named for their correspondence to the three tristimulus curves of the human visual response.
Ensuring Color Accuracy
Tristimulus color filters on a rotating filter wheel allow imaging systems to carry out color measurement in line with CIE color-matching functions and chromaticity values. Light passing into the metrology device is fed through the respective filters and then recorded by a sensor. The filters modify the incoming light, blocking particular wavelengths to ensure the camera sensor captures a measurement image with values that are as close as possible to what the human eye perceives.
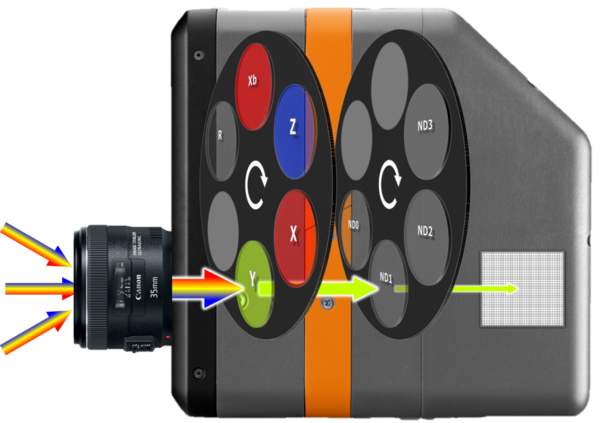
A CIE-matched tristimulus filter wheel system (shown here inside a ProMetric I-series Imaging Colorimeter) enables a measurement device to capture light and color as values that reflect the spectral sensitivity of the human eye.
A 2020 study by Jensen, Piehl, and Renner2 shows that the tristimulus filter wheel system demonstrated a high degree of accuracy for CIE standard color measurement, and typically performs better than Bayer Pattern (RGB) measurement systems for accuracy to a known reference.
Beyond using tristimulus filters, Radiant applies additional methods to increase the precision of color measurements obtained by our systems. One method, called Enhanced Color Calibration™ (ECC), applies state-of-the-art calibration algorithms to ensure accuracy and minimize variability across the CIE color space.
Enhanced Color Calibration
The ECC method generates a 12-element correction calibration matrix to optimize the capacity of the color measurement system to withstand variability. What this means is that a Radiant colorimeter can supply accurate color measurement across a large area of the CIE color space from a Calibration Point, as shown in the image below right.
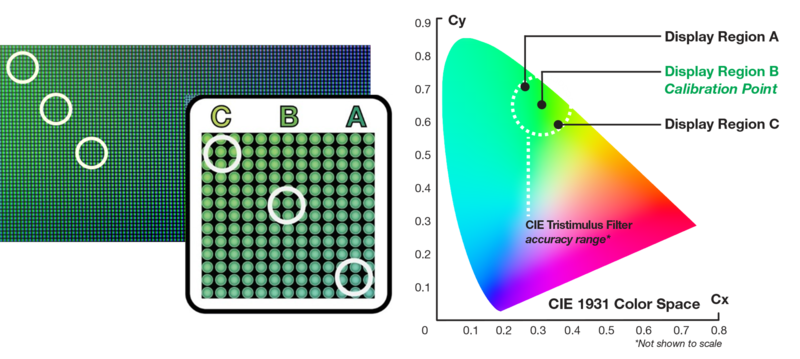
Consider differently colored regions of a non-uniform display, as represented by A, B, and C in the image at left . Radiant imaging systems provide an innately close spectral response between tristimulus filters and CIE color-matching functions. Combined with ECC, this enables the system to continue to provide accurate measurement across the display, even as source spectral data deviates further from the calibration point. The chart at right shows the expected accuracy limit (area within the white dotted line circle) for values A, B, and C plotted from the left example.
In the same study cited above, ECC supplied the greatest level of color measurement accuracy compared to Bayer systems or even when using non-ECC calibrated tristimulus filters alone. ECC reinforces the chromaticity measurement accuracy of CIE-matched tristimulus filter imaging systems.
Calibrating Radiant ProMetric® Imaging Systems
During manufacture at our factory, all Radiant cameras receive several types of calibrations to ensure optimal performance, including a flat field calibration and luminance calibration. To ensure accurate chromaticity measurement according to CIE standards, a common calibration method uses reference data captured by a spectroradiometer.
Radiant’s ProMetric I Imaging Colorimeters are calibrated for absolute color measurement using Konica Minolta spectrophotometers as the reference, recognized industry-wide for their accuracy. In addition to these initial calibrations, Radiant recommends periodic recalibration to ensure long-term performance and accuracy.
Why Recalibration Matters
When you drive a new car off the lot, you expect that it will require periodic maintenance throughout its lifetime to ensure that it performs at its very best. Much like a car or other sophisticated piece of machinery, Radiant ProMetric Imaging Photometers and Colorimeters need regular recalibrations to keep functioning at their best.
Recalibration ensures measurement results remain consistent long term. Under normal usage conditions, there is tendency for the results of any metrology instrument to ‘drift’—to see a decrease in accuracy.3 Drift can be caused by common factors such as thermal expansion and contraction of metal parts due to slight changes in temperature within a facility.
Neglecting regular recalibration for long periods of time can result in debris and dust particles in the camera, dead sensor pixels, or moisture retention. Incremental buildup of contaminants can degrade the performance of a metrology instrument over time. Additionally, if the instrument is dropped or sustains an impact, mechanical damage can occur. Any of these issues can affect the accuracy of your measurement results. There is an ongoing need to maintain and recalibrate equipment throughout its lifetime for reliable, accurate, and repeatable measurements.
Radiant makes it easy for customers to recalibrate their ProMetric cameras on a regular basis. Our service centers around the globe offer NIST-traceable calibrations, with specialized equipment and staff expertise to recalibrate and repair cameras to restore their original performance and accuracy. We recommend annual recalibration and servicing to ensure optimal performance. How long has it been since your ProMetric cameras were recalibrated?
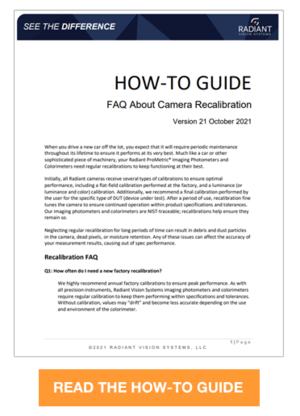
To learn more, check out Radiant’s How-To Guide: FAQ About Camera Recalibration.
CITATIONS
- “What are NIST traceable standards?” Beckman Coulter. (Retrieved October 20, 2021)
- Jensen, J., Piehl, A., and Renner, W., “Evaluating tristimulus and Bayer pattern matching system accuracy for color measurement based on CIE color-matching functions,” presented at the 34th annual electronic displays conference (edC), January. 2020.
- ”Calibration,” published by Lab Facility on labfacility.com. (Retrieved October 20, 2021)
Join Mailing List
Stay up to date on our latest products, blog content, and events.
Join our Mailing List
